Install a Local Delegate on Linux
The new Harness Delegate is currently in closed beta and available only to select users. Access is determined by the product team. See Feature Parity for current supported use cases.
This guide walks you through installing the Harness Delegate on a Linux machine. Skip to the End-to-End Demo to watch video instructions instead. For supported connectors, CI steps, secret managers, and module support by deployment type, see the Feature Parity page — that's the single source of truth, kept up to date as support expands.
To learn more about the new delegate, including architecture and how it compares to the legacy delegate, see the New Delegate Overview.
Quick Reference
| Command | Description |
|---|---|
./delegate server --env-file config.env | Start the delegate |
nohup ./delegate server --env-file config.env > nohup-delegate.out 2>&1 & | Start in the background |
Important file locations:
| Item | Path |
|---|---|
| Config File | ./config.env (where you created it) |
| Logs | ./nohup-delegate.out |
Get Harness Credentials
Before installation, obtain your Account ID, Delegate Token, and Harness URL.
- Interactive Guide
- Step-by-Step
-
Open Delegate settings: In the left nav, click Project Settings, then under Project-level Resources, click Delegates.
-
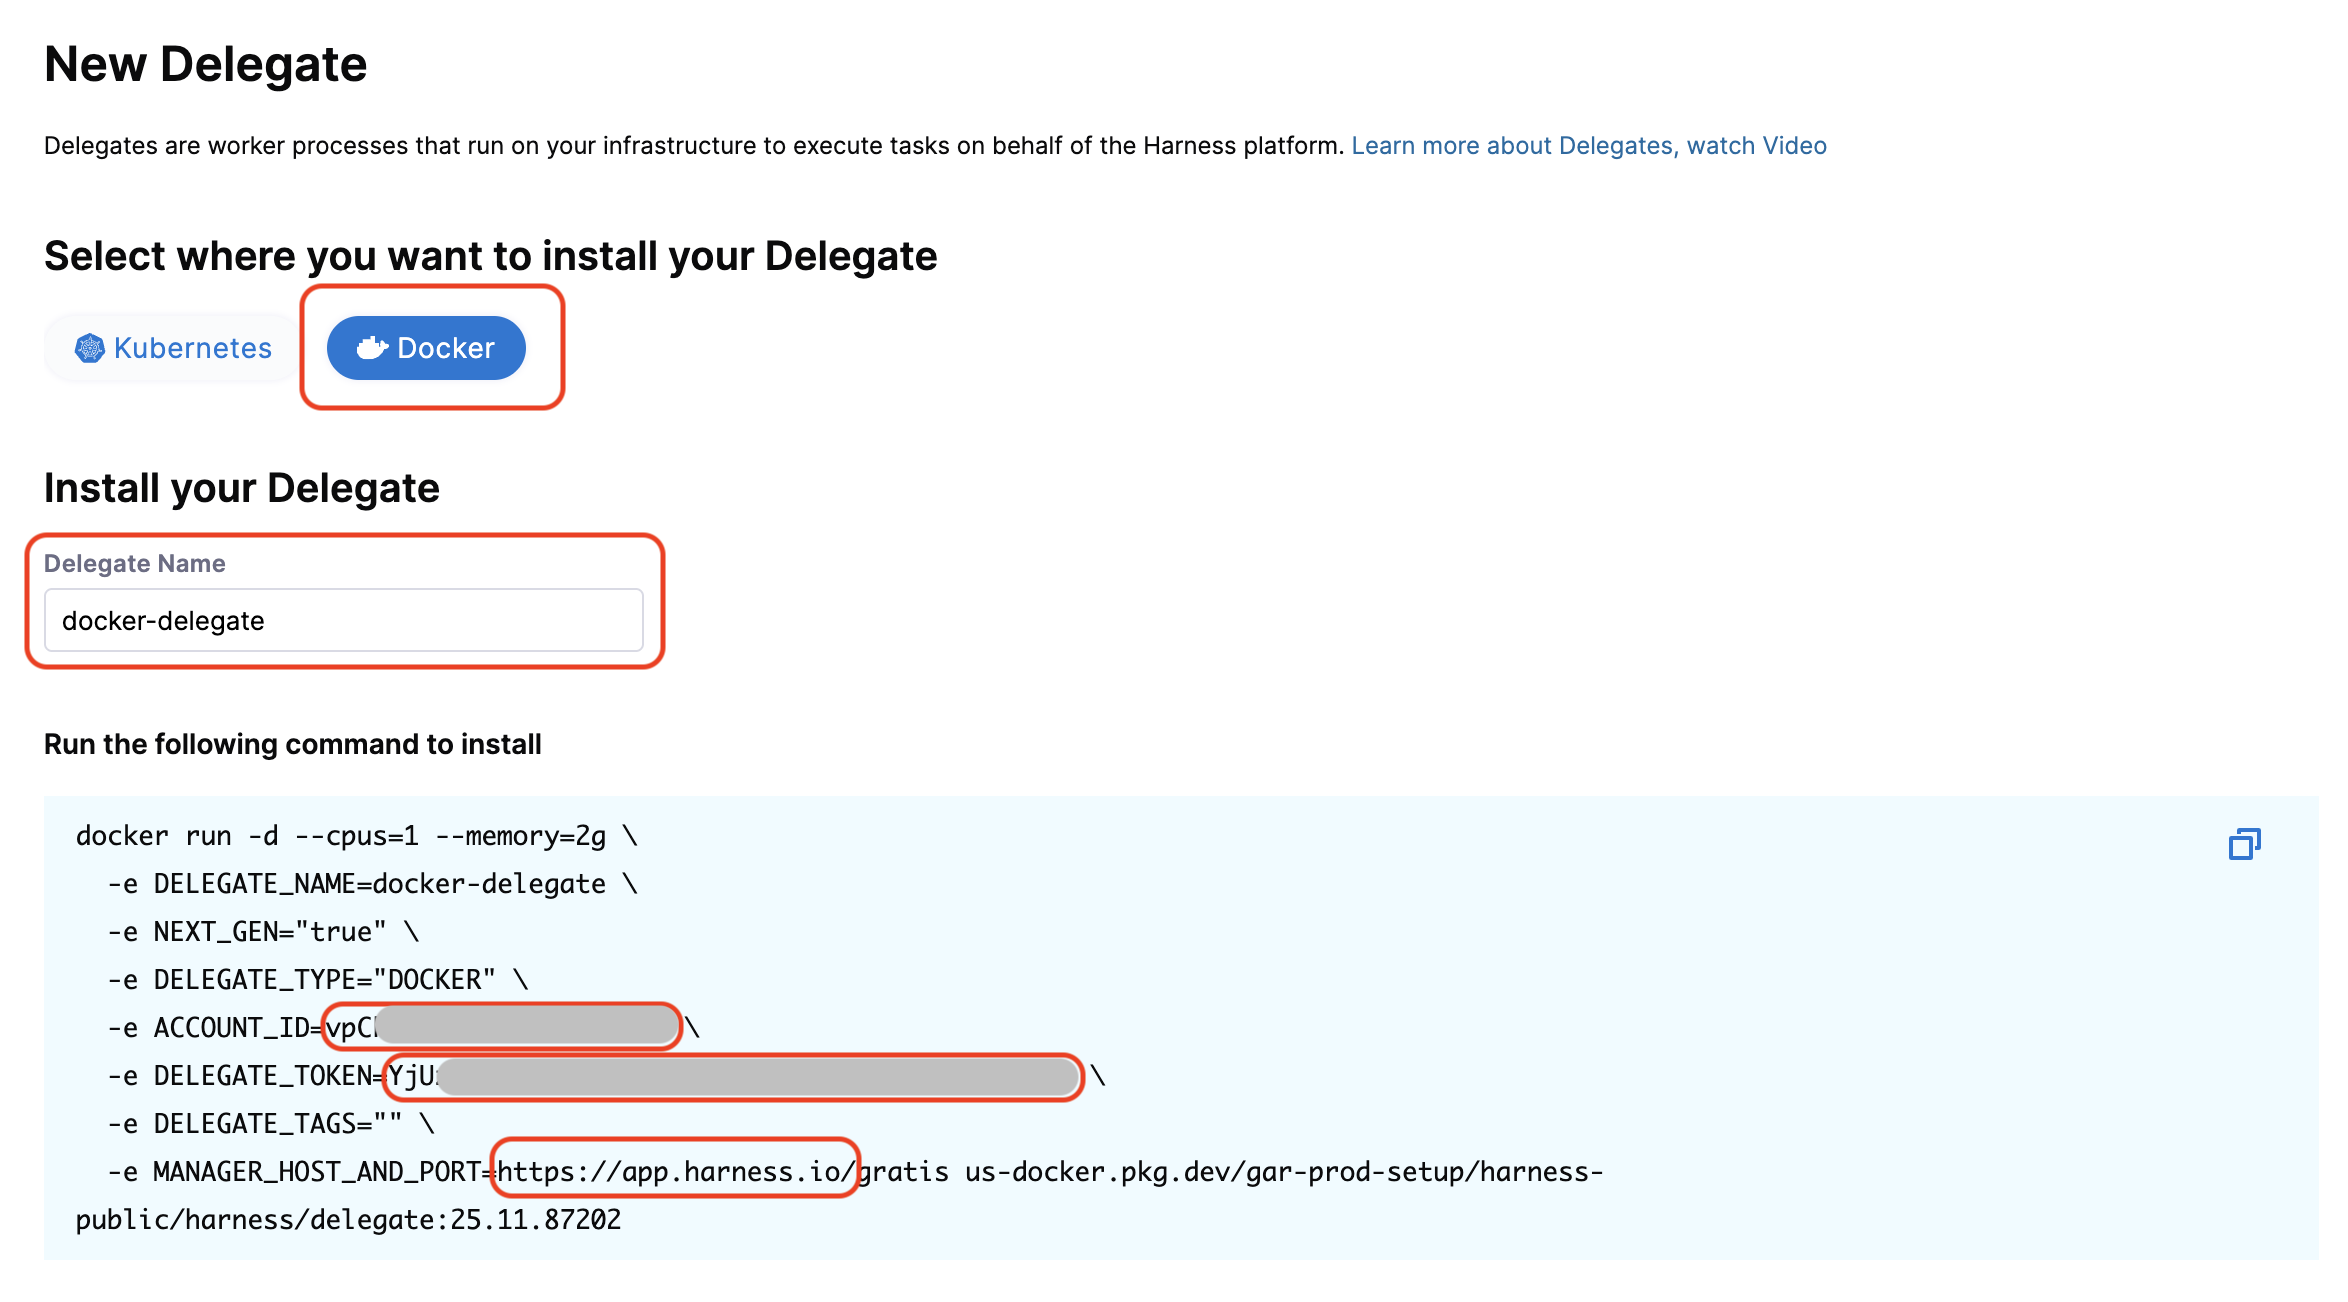
Create a new delegate: Click + New Delegate and choose Docker as your delegate type.
-
Copy the credentials from the
docker runcommand:ACCOUNT_ID→ Your Account IDDELEGATE_TOKEN→ Your Delegate TokenMANAGER_HOST_AND_PORT→ Your Harness URL
Keep these values ready — you'll use them in the configuration file.
Download and Install the Delegate
Step 1: Download the Binary
For arm64:
curl -L "https://app.harness.io/public/shared/delegates/1.28.0/delegate-linux-arm64" -o delegate
chmod +x delegate
For amd64:
curl -L "https://app.harness.io/public/shared/delegates/1.28.0/delegate-linux-amd64" -o delegate
chmod +x delegate
Step 2: Create Configuration File
Create a config.env file with the credentials you obtained from the previous step:
cat > config.env <<EOF
HARNESS_ACCOUNT_ID="[Your Account ID]"
HARNESS_TOKEN="[Your Delegate Token]"
HARNESS_URL="[Your Harness URL]"
HARNESS_NAME="[Your Delegate Name]"
EOF
If you don't specify HARNESS_NAME, the delegate defaults to harness-delegate.
Optional: Add tags
Tags are useful for routing specific pipelines to this delegate:
cat > config.env <<EOF
HARNESS_ACCOUNT_ID="[Your Account ID]"
HARNESS_TOKEN="[Your Delegate Token]"
HARNESS_URL="[Your Harness URL]"
HARNESS_NAME="[Your Delegate Name]"
HARNESS_TAGS="production,linux"
EOF
Step 3: Start the Delegate
Run in the background:
nohup ./delegate server --env-file config.env > nohup-delegate.out 2>&1 &
Step 4: Verify Installation
Check the logs:
tail -f nohup-delegate.out
Navigate to Project Settings > Delegates in the Harness UI. You should see your delegate with a Connected status.
Additional Configuration
Proxy Configuration
The delegate inherits system-level proxies by default, but you can set a custom proxy through the delegate config. Edit config.env and add:
PROXY_HOST=3.139.239.136
PROXY_PORT=3128
PROXY_SCHEME=http
PROXY_USER=proxy_user
PROXY_PASSWORD=password
NO_PROXY="localhost,127.0.0.1,.corp.local,10.0.0.0/8"
Alternatively, set environment variables:
export HTTP_PROXY="http://USER:PASSWORD@PROXY_HOST:PORT"
export HTTPS_PROXY="http://USER:PASSWORD@PROXY_HOST:PORT"
export NO_PROXY="localhost,127.0.0.1,.corp.local,10.0.0.0/8"
Manual Plugin Installation
Some CI steps can run directly on the host. Harness automatically downloads required plugins, but manual installation is needed when your infrastructure lacks internet connectivity (e.g., behind a proxy or firewall).
-
Download the plugin from its source (e.g., drone-git v1.7.6).
-
Decompress:
zstd -d plugin-linux-arm64.zst(orplugin-linux-amd64.zst). -
Move to the plugins directory:
mkdir -p ./default/plugin/drone-git/
mv plugin-linux-* ./default/plugin/drone-git/
chmod +x ./default/plugin/drone-git/plugin-linux-*
Manage the Delegate
- Stop: Find and kill the process using
psandkillcommands. - Upgrade:
- Download the new binary: Replace the existing
delegatefile. - Kill the existing process.
- Start with the command from Step 3.
- Download the new binary: Replace the existing
Configure Pipeline Delegate
For the CI stages that you want to use the new delegate with, define the stage variable HARNESS_CI_INTERNAL_ROUTE_TO_RUNNER and set it to true.
Then, set your pipeline's build infrastructure as usual. Ensure that you have set Local as the Infrastructure and that the Operating System and Architecture match the delegate you installed.
Delegate Configuration
The config.env file location:
- Default: Location where you created it
- Custom workdir:
{workdir}/config.env
For configuration options that apply across all platforms — including stage capacity limits, graceful shutdown, containerless steps, init scripts, log rotation, metrics, and token management — see the Delegate Configuration Reference.
Configure Custom Working Directory
By default, the delegate stores its configuration files, logs, and cache in the current working directory.
Set the HARNESS_WORKDIR environment variable before running the binary:
export HARNESS_WORKDIR=/custom/path/to/workdir
./delegate server --env-file config.env
The delegate automatically creates the directory and subdirectories. Ensure the delegate process has read/write permissions for this directory.
Debugging
Logs
You can find the delegate logs in the following locations:
- Default:
nohup-delegate.out - Custom workdir:
{workdir}/logs/delegate.log
View logs in real time:
tail -f nohup-delegate.out
Upgrading the Delegate
There is currently no automated upgrade mechanism for the new delegate. The upgrade process involves stopping the delegate, downloading the latest binary, and restarting it.
- Stop the running delegate (kill the process).
- Download the latest binary from the installation step, replacing the existing
delegatefile. - Start the delegate using the command from Step 3.