Get Started with Load Testing
Load Testing simulates user traffic to validate your system's performance under expected and peak load conditions. Identify bottlenecks, validate scalability, and ensure your applications can handle production workloads before they face real users.
Load Testing is currently behind a feature flag (CHAOS_LOAD_TESTING_ENABLED). Contact your Harness sales representative to get it enabled for your account.
Prerequisites
- Access to the Harness Resilience Testing module
- A Linux Chaos Infrastructure with load testing enabled (
--loadflag) configured in your project - An environment created in your project for the infrastructure
- Target application endpoints accessible from the test infrastructure
Create your first load test
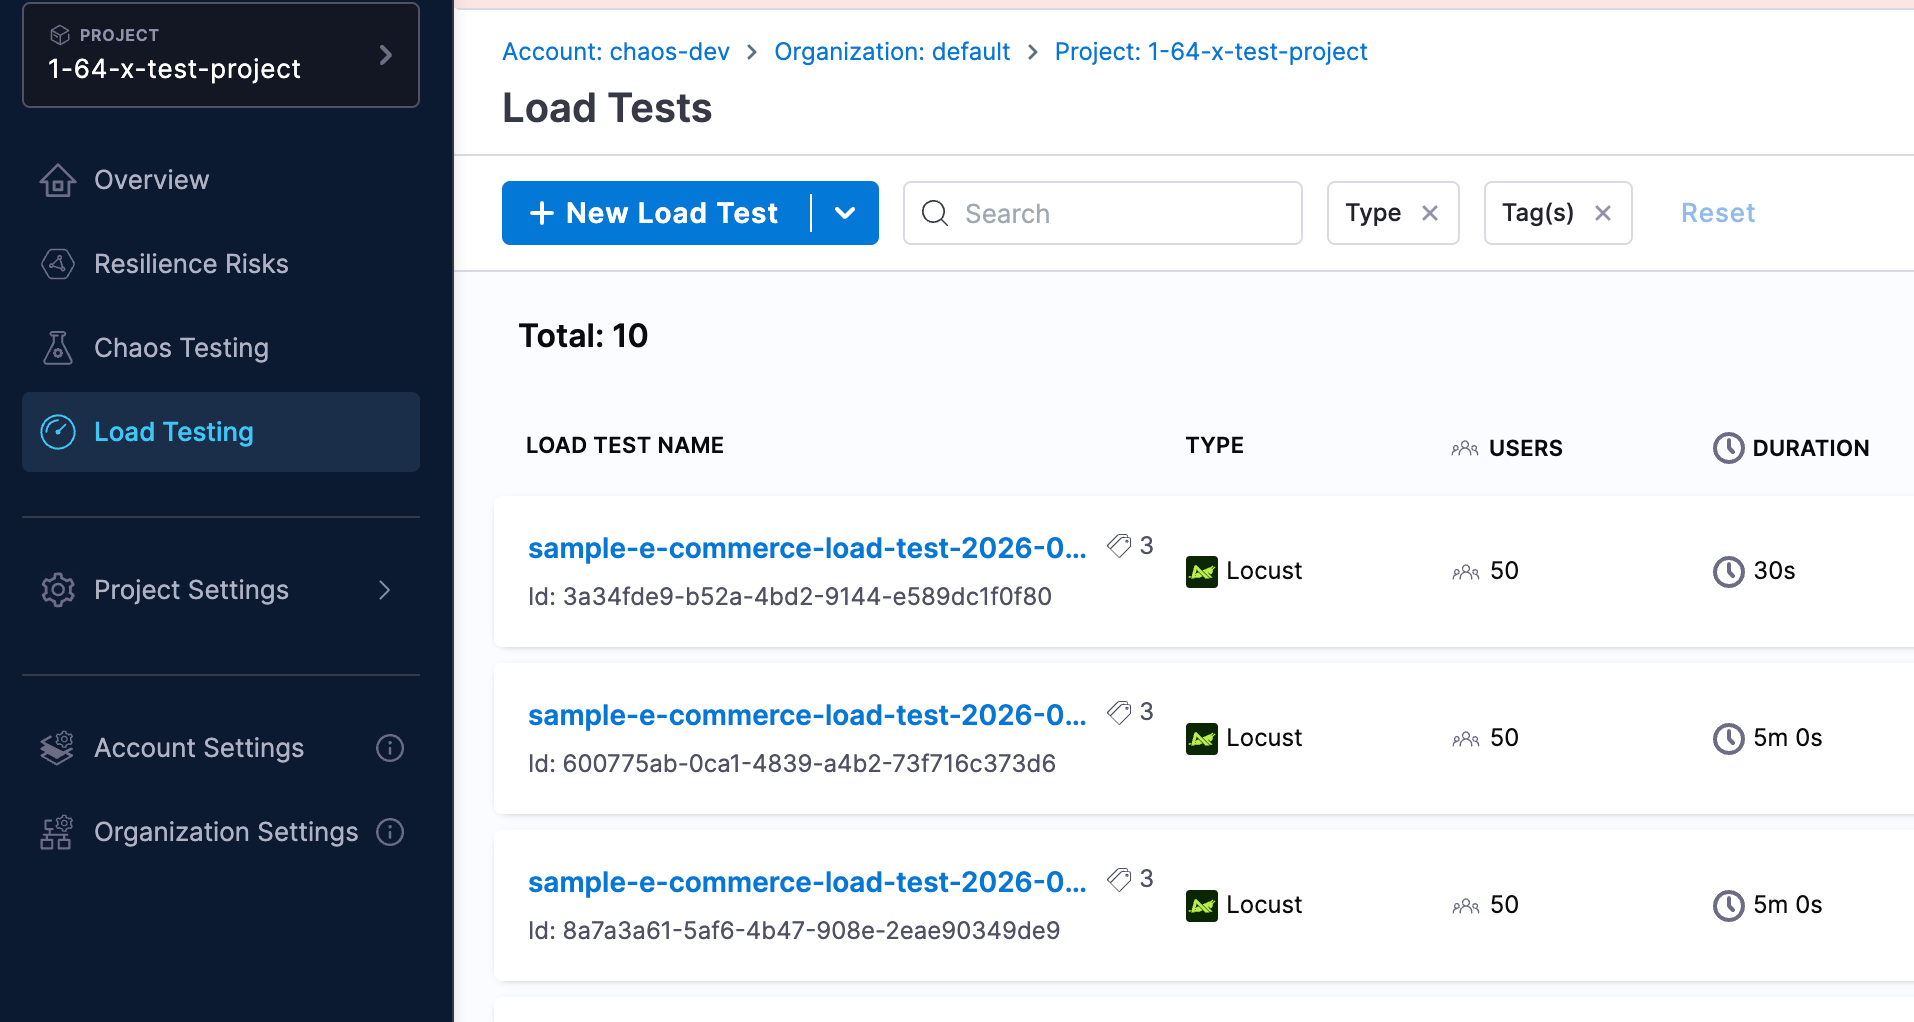
- Navigate to Resilience Testing > Load Testing
- Click + New Load Test
Click the + New Load Test dropdown and select Try Sample Test to instantly explore the feature with a pre-configured test: sample endpoints, realistic load settings, and example configurations included.
Step 1: Overview
Fill in the test metadata and select your infrastructure:
| Field | Description |
|---|---|
| Name | A descriptive identifier for the test |
| Description | (Optional) What the test validates |
| Tags | (Optional) Labels to organize tests |
| Load Test Type | Select Locust (Python-based). JMeter and K6 are coming soon. |
| Infrastructure | Select a Linux Chaos Infrastructure (installed with the --load flag) from the dropdown |
Click Next to proceed to Test Configuration.
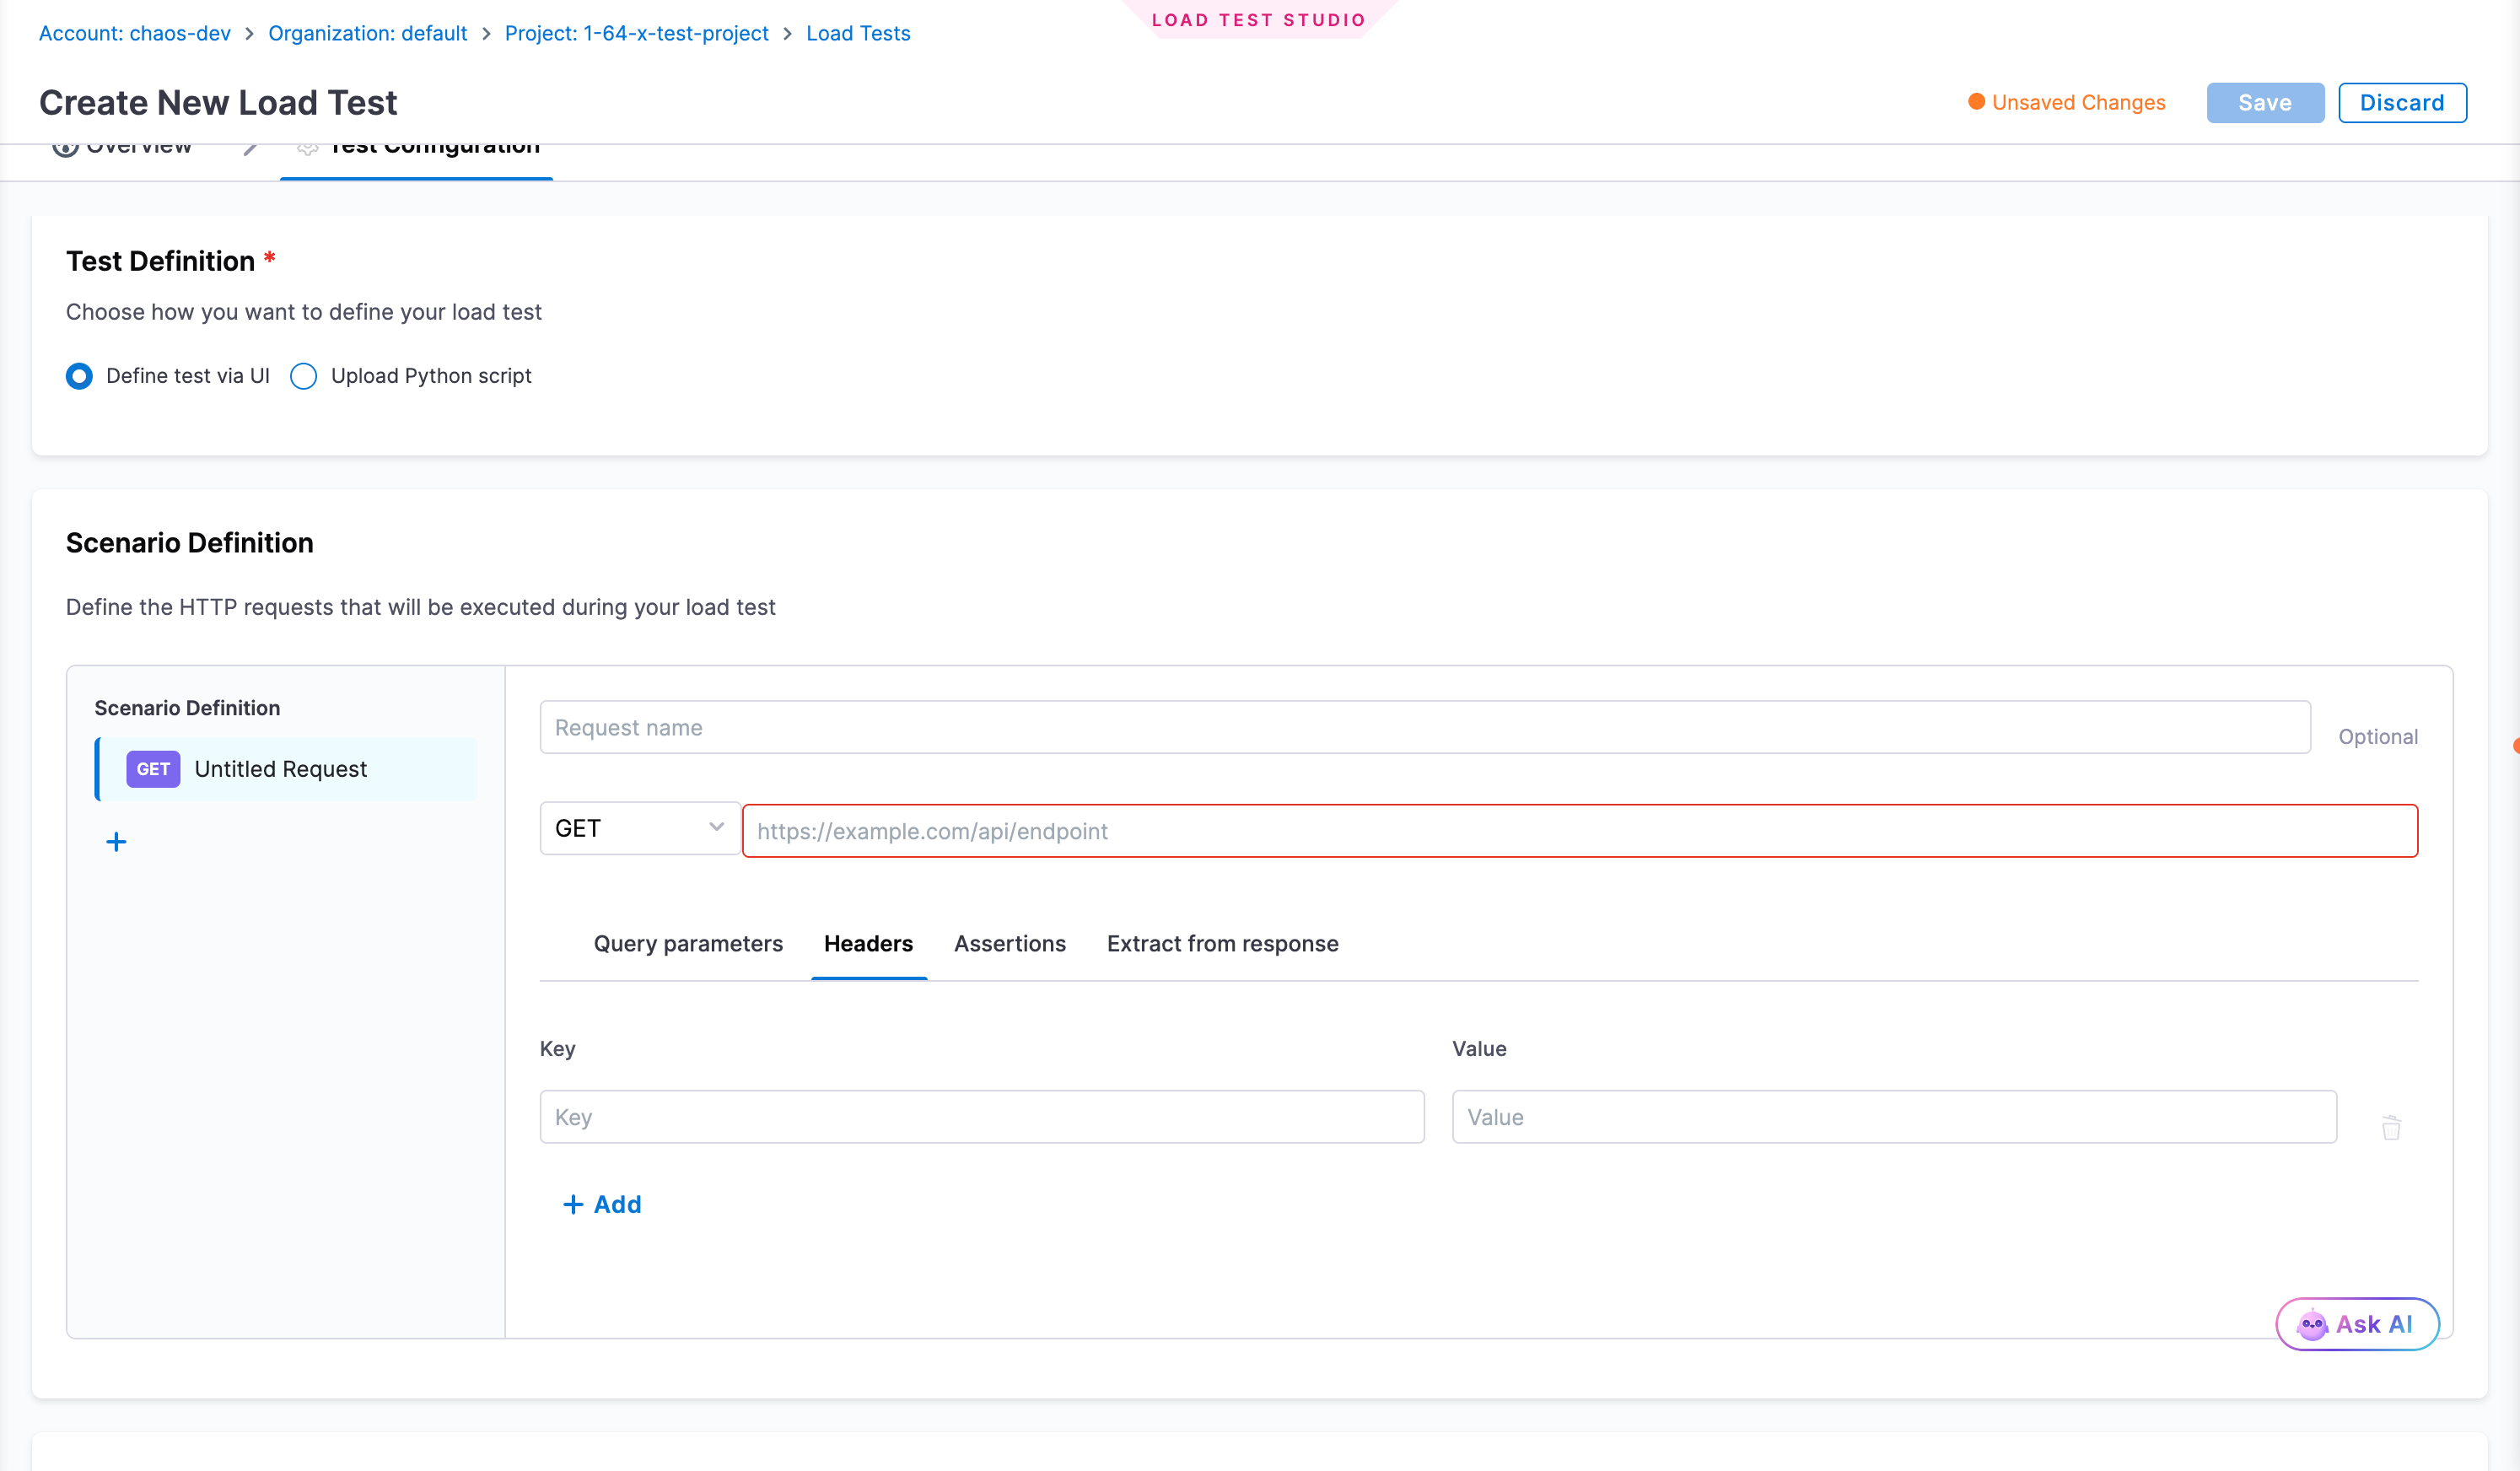
Step 2: Test Configuration
Choose how you want to define the test workload.
Option A: Define test via UI
Use the visual editor to build HTTP scenarios without writing code. Harness generates the Locust script from your configuration at execution time.
Scenario Definition
Each request represents one HTTP call your virtual users execute on every loop. For each request:
| Field | Description |
|---|---|
| Request name | Optional label to identify this request in results |
| HTTP Method | GET, POST, PUT, DELETE, PATCH, HEAD, or OPTIONS |
| URL | Full endpoint URL (e.g., https://api.example.com/users) |
Each request has four tabs:
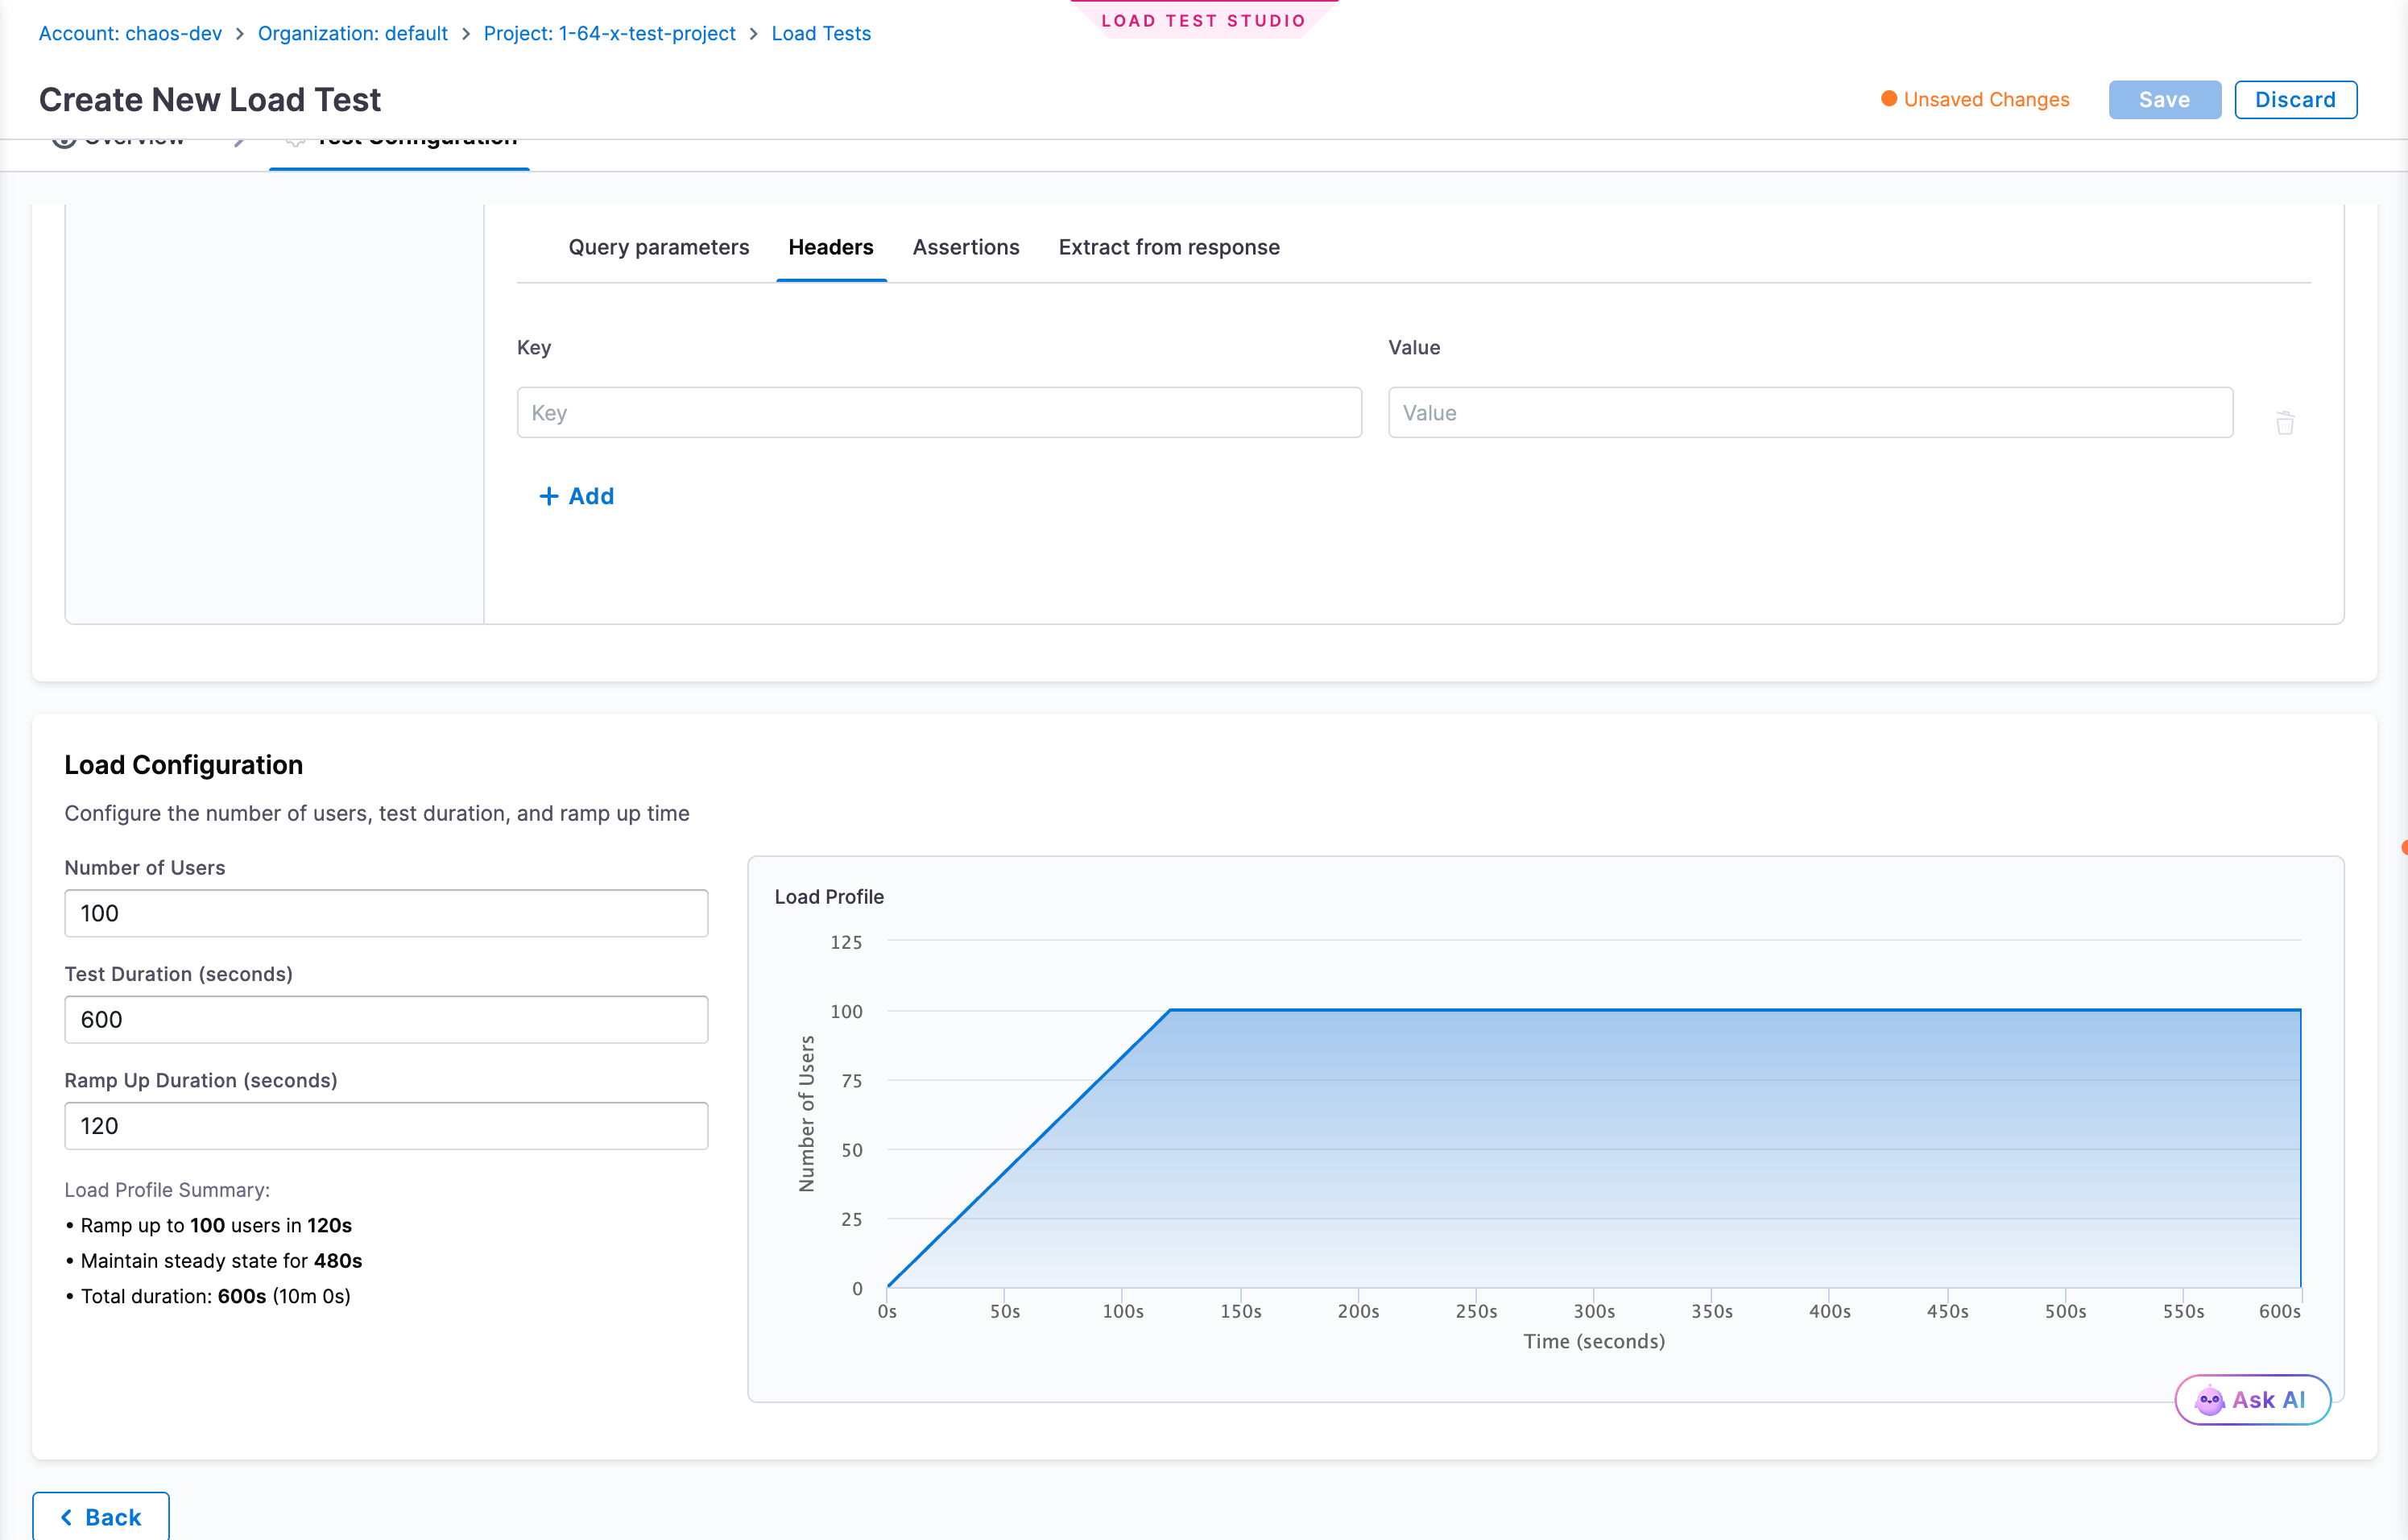
Query Parameters - Key-value pairs appended to the URL as ?key=value&key2=value2.
Headers - HTTP request headers. Common examples: Authorization: Bearer <token>, Content-Type: application/json.
Assertions - Conditions that must be true for the request to count as a success. Failed assertions are recorded as errors in results.
| Assertion type | Validates |
|---|---|
| Text | Response body contains (or does not contain) a specific string |
| Response Time | Request completes within a specified threshold (milliseconds) |
Extract from Response - Captures a dynamic value from a response (e.g., a login token) and stores it as a variable for use in later requests. Reference extracted values with {{variable_name}}.
Click + to add more requests to the scenario.
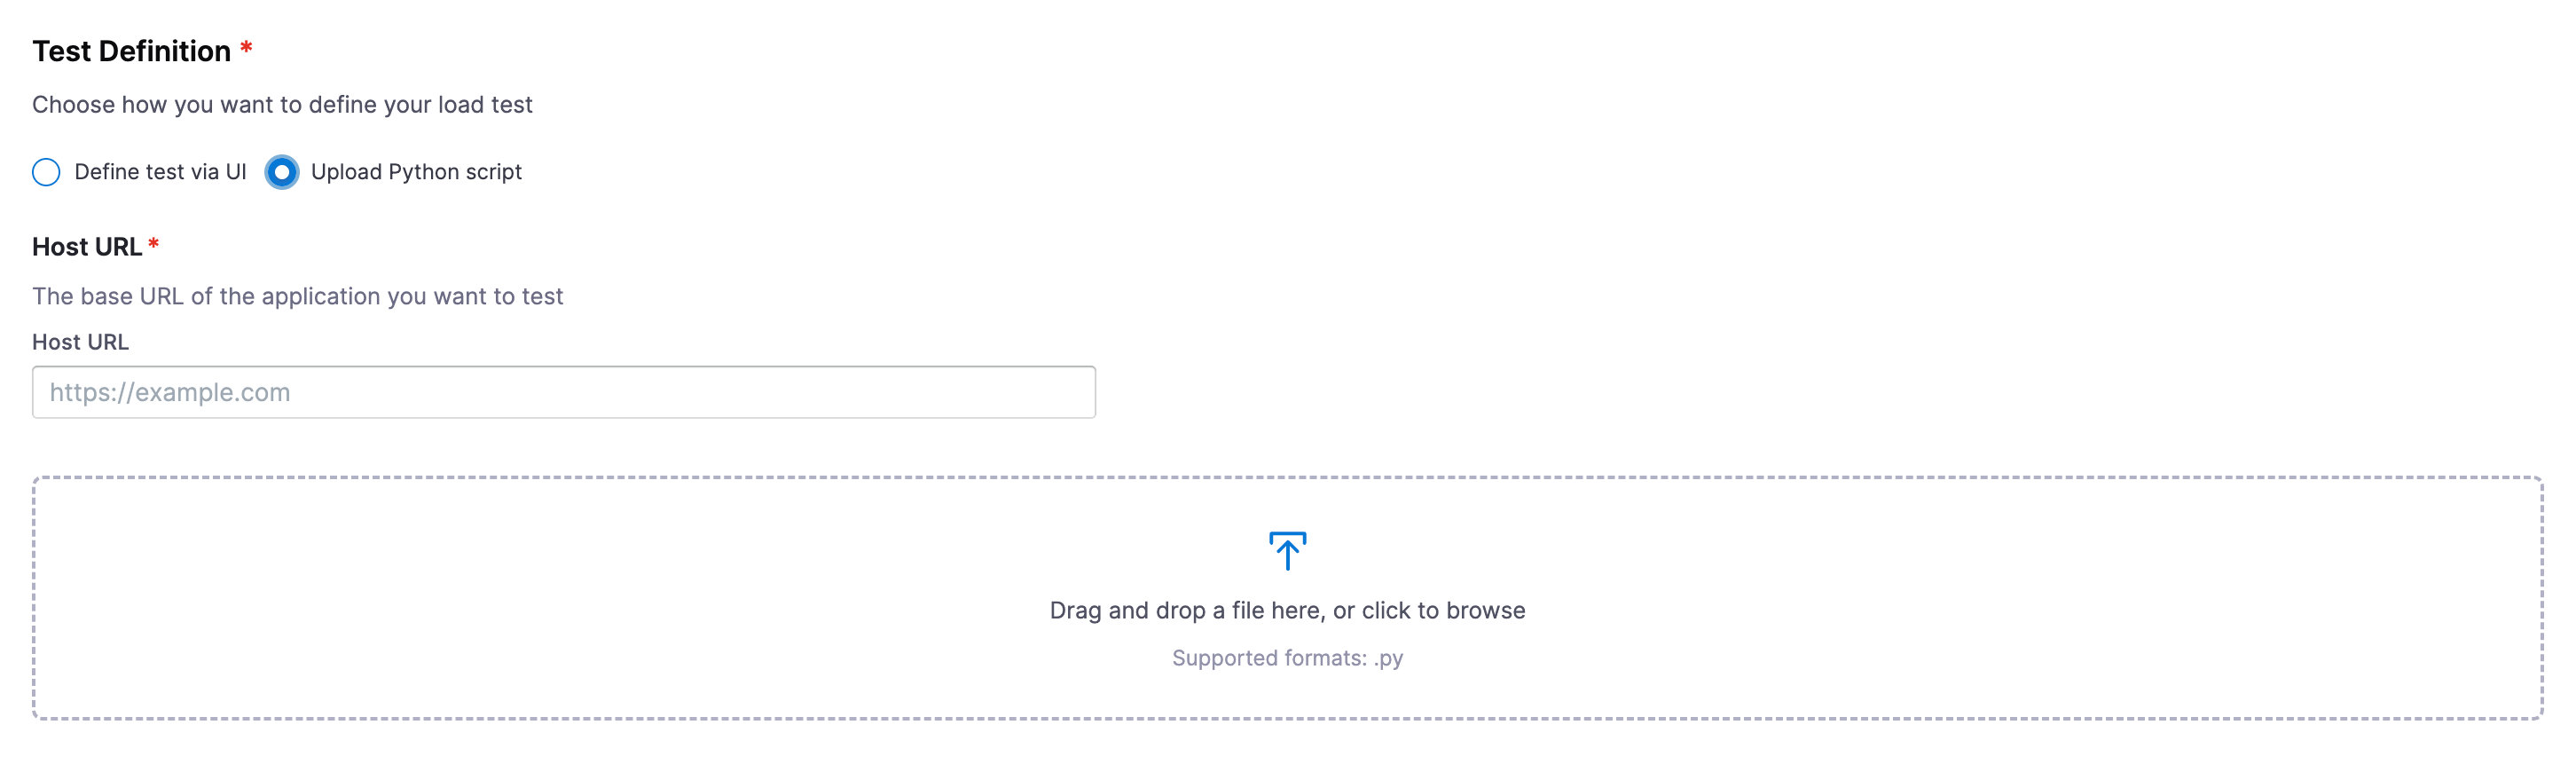
Option B: Upload Python Script
Upload a custom Locust .py script for advanced scenarios requiring custom logic, authentication flows, or complex user behavior.
| Field | Description |
|---|---|
| Host URL | Base URL of the application under test. Locust prepends this to all relative paths in your script. |
| Script file | Drag and drop or click to browse. .py files only. |
from locust import HttpUser, task, between

class WebsiteUser(HttpUser):
    wait_time = between(1, 3)

    @task
    def get_homepage(self):
        self.client.get("/")

    @task(2)
    def get_products(self):
        self.client.get("/api/products")
@task(weight) controls relative execution frequency across tasks.
Step 3: Load Configuration
Configure how virtual users are ramped up and sustained during the test:
| Parameter | Description | Constraint |
|---|---|---|
| Number of Users | Peak concurrent virtual users | Must be a positive integer |
| Test Duration (seconds) | Total test runtime | Must be greater than Ramp-Up Duration |
| Ramp-Up Duration (seconds) | Time to reach peak users from zero | Must be less than Test Duration |
Steady-state duration = Test Duration - Ramp-Up Duration.
The Load Profile graph updates in real time as you adjust values. The Load Profile Summary shows a plain-English breakdown, for example: Ramp up to 100 users in 120s · Maintain steady state for 480s · Total duration 600s (10m 0s).
Step 4: Save and Run
- Click Save to create the load test
- Find your test in the Load Tests list - it shows Type, Users, Duration, and Recent Executions at a glance
- Click the Run (▶) button on any test to start an execution
- Monitor real-time results during execution
Next Steps
- Load Test Infrastructure: Set up and manage Linux infrastructure for load tests
- Analyze Results: Understand and interpret load test execution results
- Concepts: Understand virtual users, ramp-up, assertions, and load profiles
- Chaos Testing: Combine load testing with chaos experiments for peak-load resilience validation